2025-11-06 9:12:13 PM
Status:
Tags:
1 - Hosting taserver on a Windows 11 VM
I'll be setting this up on a Windows 11 VM running on my Ubuntu server. I'm mostly following Griffon26's documentation here, but I'll be explaining gaps that aren't covered as I go.
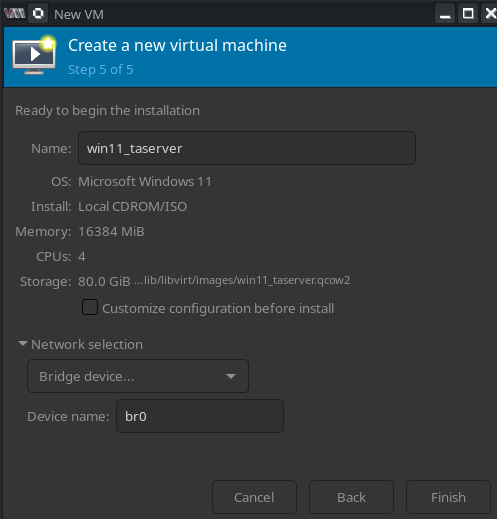
- Start by setting up a Windows virtual machine. I chose these settings to start:
- Download the latest version of Griffon26's taserver repository here: https://github.com/Griffon26/taserver/blob/master/docs/user_manual/hosting_a_login_server.md. I did that by clicking the
Codedropdown and selectingDownload ZIP. That downloads what's called the master branch. Extract the .zip file wherever you like. - Install the x86 version of Visual C++ Redistributable for Visual Studio 2015 as described in Griffon's guide: https://www.microsoft.com/en-us/download/details.aspx?id=48145
- Install Python 3 from python.org. I installed version 3.14.0 (64-bit) and checked the
Add python.exe to PATHbox and left theUse admin privileges when installing py.exebox unchecked. I also let it disable the path limit. - Open a command prompt as an administrator by searching for
cmdin the Windows Start menu, right-clicking the icon, and selectingRun as administrator. - In the command prompt, navigate to where you extracted the .zip file and go to the directory where the
requirements.txtfile lives. For me, it's this location:
cd C:\Users\taadmin\Downloads\taserver-master\taserver-master
Note
You may have to specify the full path if pip didn't get added to PATH properly. Example:
C:\Program Files (x86)\Python36\Scripts\pip install -r requirements.txt
- Next, run this command from that same directory:
download_udpproxy.py
- Next, run this command from that same directory and accept any firewall prompts that it generates:
start_taserver_firewall.py
The console should now look like this:

Note
At this point, if you wanted to open this up to players outside your LAN, you would have to forward TCP ports 9000, 9001, and 9080 to the login server on your router's firewall. But since this guide is only for LAN, we don't need this.
- Open a second command prompt as a regular user (doesn't have to be an administrator one) and navigate to the directory containing the taserver files again:
cd C:\Users\taadmin\Downloads\taserver-master\taserver-master
- Start the login server by running the
start_login_server.pyfile:
start_login_server.py
- Change
hostunder the[loginserver]section indata/gameserverlauncher.inifrom ta.kfk4ever.com to127.0.0.1to have any game server that you start connect to your locally running login server.
Note
LAN users should still be able to connect by pointing themselves to the server's LAN IP and external users by the server's public IP as long as you have configured the port forwarding rules on your router.
- Next, modify the Tribes: Ascend client target IP to point to the login server's IP address.
- Start the game and try logging in using any credentials. You should be able to log in but there won't be any game servers available yet.
Hosting a game server
I'll be hosting a game server on the same Windows 11 VM that the login server is running on. Again, I'll mostly be taking from Griffon26's guide here: https://github.com/Griffon26/taserver/blob/master/docs/user_manual/hosting_a_game_server.md
- Place a copy of the Tribes: Ascend Parting Gifts version of the game client on the Windows VM.
- Install The DirectX End-User Runtimes (June 2010) on the server, which are a pre-requisite for running Tribes: Ascend. The DirectX end-user runtimes come with the parting gifts release of Tribes. They are located in the folder
Tribes_Ascend_Parting_Gifts\Binaries\Redist. Run the self-extracting archivedirectx_Jun2010_redist.exeand extract it to any location. Once that is done finddxsetup.exeamong the extracted contents and run it. This will install any missing DirectX files. Note: Windows also prompted me to install .NET Framework 3.5 as a requirement at this step as well, so I let it do that. - At this point, I did the
Ctrl-Ccommand on both command prompt windows (The Tribes: Ascend server firewall and login server windows) and rebooted. - After the reboot, modify
dirunder the[gameserver]section indata/gameserverlauncher.inito point to the directory where your TribesAscend.exe is located. For instance:
C:\Users\taadmin\Downloads\Tribes_Ascend_Parting_Gifts\Binaries\Win32
- Open an administrator command prompt and go to the directory containing the taserver files and run this command:
download_compatible_controller.py
- Next, run this command to start the firewall:
start_taserver_firewall.py
Note
At this point, if you wanted to open this up to players outside your LAN, you would have to forward TCP ports 7777 and 7778, and UDP ports 7777, 7778, and 9002 to the game server on your router's firewall. But since this guide is only for LAN, we don't need this.
- Go into the
.../taserver/data/gamesettings/ootbfolder and open theserverconfig.luafile with your favorite text editor to change your server settings, like server name, message of the day and other settings. You don't need to restart the server every time and make changes to this file. The settings will be applied on the next map change.
Note
If you want the server to require a password for people who try to join it, uncomment the ServerSettings.Password = "some-password" and set it to what you want.
- Open a second command prompt as a regular user (doesn't have to be an administrator one) and navigate to the directory containing the taserver files again:
cd C:\Users\taadmin\Downloads\taserver-master\taserver-master
- Start the login server by running the
start_login_server.pyfile:
start_login_server.py
- Open a third command prompt as a regular user (doesn't have to be an administrator one) and navigate to the directory containing the taserver files again:
cd C:\Users\taadmin\Downloads\taserver-master\taserver-master
- Start the login server by running the
start_game_server_launcher.pyfile and accept any firewall prompts that it generates:
start_game_server_launcher.py
- Start your Tribes: Ascend client and log in. You should see your server in the server browser and be able to join it.
Anyone else on LAN should be able to just have the Parting Gifts client and point their -hostx target to the LAN IP of your login server (I tested this).
Note
Make sure your server isn't set to go to sleep or anything like that so that the server remains available. I ran into this issue with my Windows VM.
Verifying accounts on your server
- Open a third command prompt as a regular user (doesn't have to be an administrator one) and navigate to the directory containing the taserver files again:
cd C:\Users\taadmin\Downloads\taserver-master\taserver-master
- Run this command (replace with actual data):
getauthcode.py <accountname> <email address>
Example:
getauthcode.py Edgetune [email protected]
It should return something like this:

Log in to the game with that username and your desired password, then go to Store>Redeem Promotion and enter that verification code. You should receive a success message in the top-left. Exit and restart the game and log in using the username and password you created and you should now be verified and in the database.
Shutting it all down
When you're ready to shut down, start by shutting down the game server from the window that you started it from with Ctrl-C, then close that window. Then, do the same with the login server window. And finally, the firewall window.
Starting it all back up again
Open the firewall with an administrator command prompt, then with two regular command prompt, open the login server and then the game server.
Firewall:
cd C:\Games\taserver-master
start_taserver_firewall.py
Login server:
cd C:\Games\taserver-master
start_login_server.py
Game server:
cd C:\Games\taserver-master
start_game_server_launcher.py
Enabling GOTY-like servers
To run a GOTY-like server, you can follow the instructions here exactly: https://github.com/Griffon26/taserver/blob/master/docs/user_manual/hosting_a_game_server.md
Basically, run this script in a normal command prompt:
download_gotylike.py
Then edit data/gameserverlauncher.ini and replace:
controller_config = data\gamesettings\ootb\serverconfig.lua
With:
controller_config = data\gamesettings\gotylike\serverconfig.lua
Save it and close it.
Now, start up the server and it will be a GOTY server. Reverse the change in the gameserverlauncher.ini to go back to the OOTB server. With this method, you can only run one at a time (can't have both OOTB and GOTY available at the same time). Griffon26 has another documentation page here that explains how to run multiple game servers at the same time but I haven't tried it: https://github.com/Griffon26/taserver/blob/master/docs/user_manual/hosting_multiple_game_servers.md
Getting rid of annoying ms-gamingoverlay popup
My Windows 11 server keeps opening numerous popups while the Tribes: Ascend server runs. The Window title says "Pick an App" and the text says "We can't open this 'ms-gamingoverlay' link". To fix it:
- Open registry editor as an admin.
- Navigate to here:
HKEY_CURRENT_USER\Software\Microsoft\Windows\CurrentVersion\GameDVR. - In the right-hand pane, right-click an empty space, select New > DWORD (32-bit) Value, and name it
AppCaptureEnabled. - Double-click the new
AppCaptureEnabledvalue and set its Value data to0. - Restart the server.
That fixed the issue for me.
Allowing your login server and game server to be reachable outside of your LAN
To open your login server and game server to the public, you will need to forward some ports on your router.
Note
LAN clients will still be able to connect using the LAN IP address.
Login server port forwarding rules:
Point the following rules to your login server's LAN IP address. For me, that's 172.28.3.149.
- TCP port 9000
- TCP port 9001
- TCP port 9080
Game server port forwarding rules:
Point the following rules to your game server's LAN IP address. For me, that's 172.28.3.149.
- TCP port 7777
- UDP port 7777
- TCP port 7778
- UDP port 7778
- UDP port 9002